

PROP MAKING- Bookbinding workshop
- MikAnimate

- Aug 21, 2020
- 3 min read
Updated: Oct 12, 2020
Where to begin? My thoughts exactly. I started with the creation of a single book that way I could determine the scale of all the bookbinding machinery and the tools from my character's hands and the size of the book.
Paper staining and bookbinding
Firstly I cut a few hundred pieces of paper and individually stained them in water, brown food colouring and coffee grains. I then sewed the pages similar to that of an actual bookbinder. To make the endpapers I marbled some paper using nail polish. I then created the cover of the book out of FIMO leather effect clay which turned out to be not as flexible as I thought it would be.


Since I need to fill the shelves in my set with a hundred books give or take I needed to find a lot simpler method for producing books. I found that by cutting up some cardboard, bending it and sticky taping small bits of shoe string across its spine the model looks like the spine of a vintage book.


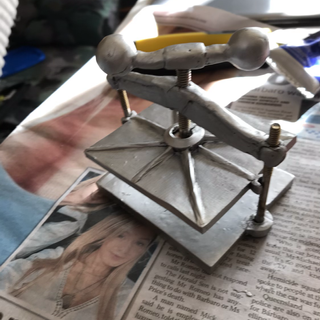
Bookbinding machinery
The press was fun to make. I used large screws and super sculpey firm to make the prop. Then I made it look metallic by rubing on some rub 'n' buff. Then I added shoe polish to the grooves and edges to give it some texture and oil stain.
For the sewing structure I used different sized sqewers, popsicles and ply. It was very tricky tying the cotton onto the wood as it kept sliding off. A bit of glue held it in place.


Furniture
A few weeks ago a friend of mine gave me a Rolife dollshouse miniature bookshop room and it taught me two things. Firstly, how to wire mini LEDS correctly and secondly, that model furniture is easier to assemble if it has grooves that lock into place. Measurements were key in creating these bookcases as the grooves needed to not be too loose or get stuck when assembling. Ply was the perfect material to use when assembling these objects as it was easy to snap off excess pieces.


Candles
I used Shrink tubing to hold the wires in place. I then painted the tubing white so that it matched the colour of the modeling wax that I sculpted around it. For the candle flame I am using JOVI plasticine as it is the most transparent plasticine. To create the candle holder I cut a bell in half and attached two eyelets for the holder. For the fire in the fireplace I am using clear moldable ear plugs to create the flames but to colour the flame orange I had to superglue an orange balloon onto the LED. To create the logs I carved the edges to roughen it up and then burnt the edges. For the matchsticks I dipped matchsticks in red wax that I melted under a candle.


Tools
Making the tools was exciting at first but became very tiresome as my models melted in the oven twice. I eventually worked out that this was due to some wood shavings mixing in with the clay. I used shellac to stain the cotton holders and I made the feather pen out of aluminium flashing, white paint and baby powder for a matte finish. The glasses were made from clay with blackwrap hinges and resin lenses.


Replacement water pieces
I found that selleys all clear sealant mixed with food colouring makes great water replacements. It is a much les stickier option than last year's toffee makin. Below you will see coffee replacements and ink splash replacements. I'm not sure if I will use the ink replacement pieces yet but I thought that it would make a good test animation.


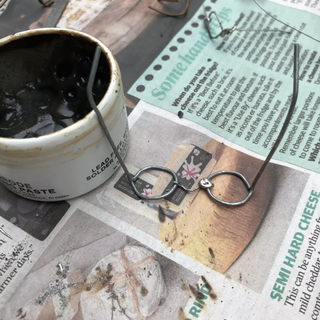
Soldering
I was not happy with the strength of the previous glasses so I decided that soldering some wire glasses might be a better approach. Soldering is a very fiddly process that I need to practice and experiment with. Most of the time the solder just slid off of the wire. This may have been because the wire was not clean enough and did not have enough scratches on it from the brush. One method worked well which was suggested my lecturer and that was to file down the solder instead of trying create smaller blobs.


Finished Props
On the whole I am very pleased with the props that I have produced. I definitely need to spend more time on texturing in future or if I get time before shooting.


Amazing work Mikayla. You're very resourceful and inventive. The props look great.